
Designing high performance Kanban processes
Kanban is a popular Agile methodology used to manage workflows and improve productivity. A Kanban board is a visual representation of your team’s workflow and tasks, organised into columns and cards. Each card represents a task or user story, and the columns represent the different stages of the workflow.
See my post on Benefits of kanban for an explanation of why you should be utilising the Kanban methodolody for your team.
In this blog post, we will discuss how to design a high performance Kanban process.
Step 1: Determine the card types
Kanban boards are based on cards, and each card represents a single piece of work. Before you begin designing your board, determine what types of cards you need. For example, you might have a card for a new feature, a card for a bug fix, a card for a spike and a card for a support request.
By defining card types, you can give better clarity to your team on the types of work items that are being tracked on your Kanban board. This can help team members understand what type of work is in progress, what work is upcoming, and what work has been completed. It can be useful to regularly review metrics on card types to identify trends and make data-driven decisions to continuously improve your team processes. If the team is consistently working on a large number of bug fix tickets in relation to new features, then there is likely an issue with quality control that needs to be resolved to reduce the count of bug fixes generated.
Card types can also help with prioritisation. For example, the “Bug Fix” card type can be used to identify work that needs to be fixed as soon as possible, while the “Feature” card type is typically used for items that are not as urgent.
Step 2: Define your workflow states
The first step in designing your Kanban board is to define your team’s workflow. This means understanding the steps your team takes to move a task from ideation to completion. A basic workflow might include states such as “To Do”, “In Progress”, “In Review”, and “Done”. However, your team’s workflow might be more complex and involve additional steps. Make sure to involve your team in defining the workflow so that everyone is on the same page.
Tip: Avoid having a ‘Blocked’ column
Sometimes Agile teams add a ‘Blocked’ state to their Kanban process with its own dedicated column on the board.
This often becomes a dumping ground for tickets that then lose focus. The transition out of the Blocked column can become confusing; which column should the ticket move to? My recommendation would be to either:
- If you expect the cause for the blockage to be resolved soon, flag the card as ‘Blocked’ and leave it in the current state.
- If you expect the cause for the blockage to take significant time to be resolved and the item is not urgent, move the card to the backlog and review it later.
Tip: Incorporate refinement preparation into the workflow
A common problem with development teams is a lack of time devoted to backlog refinement, particularly ensuring that tickets are well defined with clear scope and acceptance criteria. The ticket preparation tasks can also be allocated to a single team member, such as the Product Owner, creating a bottleneck that slows down the team.
The best Agile teams know that backlog refinement is key to success. And the absolute top performing teams focus on refinement preparation - they prepare work items before a refinement session even begins.
Inlcuding refinement preparation into your Kanban process can shorten your backlog refinement sessions, while getting more out of them.
Refinement is a place for discussion. But discussion can consume a lot more time than you anticipate. With an unprepared starting point, a lot of time in the refinement meeting can be wasted. If your team needs to cover a lot of work items, they won’t be able to go into much detail. Let’s say your team wants to cover five work items in an hour. That leaves you with 12 minutes per item, which is often not enough time to discuss and understand complex topics.
By preparing work items before refinement, the team has an advantage. They can review, and enhance acceptance criteria. Or take a glance at the actual items up for discussion to get a head start. With good preparation, you can cut down significantly on the time those five items would have taken to complete. Instead of a stressful meeting with team members losing focus while unknowns are being figured out, the team will start to see the extreme value that this short, focused refinement approach will bring. Disciplined preparation will lead to better results and less stress.
To better organise and prepare your work, you need visibility and discipline. To tackle visibility, you need to add backlog refinement columns to your Kanban board (or create a separate Kanban board for refinement). The board could look like this:
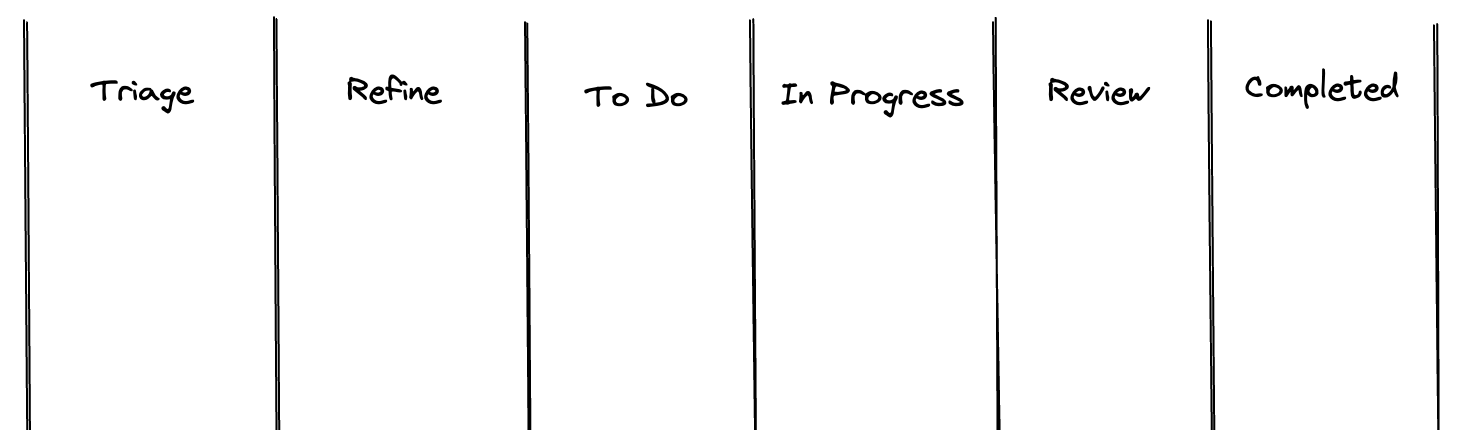
How to use the board:
Each day, when the Triage column is below WIP limit, the Product Owner (or other team members) pulls the highest priority cards from the backlog into the “Triage” column.
When the “Refine” column is below WIP limit, team members assign themselves to cards in the “Triage” column, add sufficient description, acceptance criteria, implementation plan, and then pull the ticket into the “Refine” column.
The team meets for refinement of the prepared tickets. This can be daily at standup, or for an hour long session once per week if preferred. I find that short, daily meetings keeps the team more flexible and consistently ensures that the right number of work items are ready at the right times. Waiting a week between refinement meetings can often result in stale tickets and team downtime.
The pre-refined tickets are reviewed by the team and either:
- Approved and moved into a “To Do” column.
- Rejected as needing further refinement. Maybe the scope is not clear, or there are some significant unknowns around the implementation that requires investigation before the item can be accepted into a ‘ready’ state.
Step 3: Define the transitions
Transitions refer to the movement of work items from one column to another.
When a work item is first added to the board, it could begin in the “To Do” column. As a team member starts working on the item, it is moved to the “In Progress” column. Once the work on the item is complete, it is moved to the “Done” column.
Defining transitions is an essential aspect of the Kanban process, as they allow team members to know who can move an item from one column to another, which card types can exist in which columns and what criteria must be completed before the transition can take place.
Transitions are typically triggered by specific events, such as the completion of a task or the need for a handoff to another team member.
You may have rules around who can add an item to the backlog state; can it be anyone in the team, only the Product Owner, or anyone in the business? You may have rules around who can transition a work item from “Review” to “Completed”; typically it would need to be a different team member to the person who did the work while the item was in the “In Progress” state, it might also need to be a team member with a specific role (i.e. QA).
You may also have rules on which card types transition to which columns. For example, a support request card will often transition from “In Progress” to “Completed” and skip the “Review” column.
It is also useful to define the criteria that must be accepted before a card can be transitioned. Here are some examples:
“Refine” > “To Do”
- A description has been added.
- Acceptance criteria are well defined.
- The team have agreed that the requirements are clear and a rough implementation plan is suitable.
“In Progress” > “Review”
- The required source code has been pushed to a branch on the remote repository.
- Sufficient tests have been added to cover the new code.
- All automated tests have been run and have passed.
- A pull request has been created.
- Appropriate ocumentation has been prepared for the feature/fix.
“Review” > “Completed”
- Manual testing has been completed.
- The pull request has been merged.
- The change has been deployed to production.
- The release has been announced.
Tip: Do not allow backwards transitions
I have seen teams transition cards in both forwards and backwards directions. For example, from “In Progress” to “Review”, then back to “In Progress” and back to “Review” as more changes are requested.
I find that this adds significant complexity to the workflow and it is harder to track the progress of work items. If additional implementation work is required, I would recommend either:
- Holding the card in the “Review” column while that work is completed.
- If a significant amount of extra work is required, create a new card in the backlog for it.
One exception for this rule is moving items to the backlog. There may be times when the value of a particular work item has been reduced (e.g. a simple workaround has been found) or a reprioritisation suggests there is more important work to be done. BUT, the work item is still worth keeping in case there is capacity to bring it back later on. In this case it makes sense to send the item back to the backlog where it can remain for the time being.
Step 4: Define WIP limits
Work In Progress (WIP) limits help to prevent your team from becoming overwhelmed with too many tasks at once and ensure a consistent flow of work through the various states that you have defined. These limits restrict the number of cards that can be in a particular column at any given time. When a limit is reached, the team must focus on completing the current work in progress before starting something new. WIP limits help to reduce lead time and increase productivity.
Start by analysing your team’s capacity. This includes the number of team members available to work on tasks, their skills, and the amount of time available for each member to work on tasks. Based on this information, you can determine the maximum number of tasks that can be worked on in each stage of the process simultaneously.
Once you have set the WIP limits, it is important to monitor their effectiveness and adjust them as needed. This includes tracking how many tasks are in each stage of the process, identifying where bottlenecks occur, and adjusting the WIP limits accordingly.
Tip: Reduce WIP limits to encourage working in pairs
Setting WIP limits lower than the count of team members can encourage pair programming as team members are forced to work together to complete tasks for better collaboration and communication. When team members are working closely together on a smaller number of tasks, they are more likely to share ideas and insights, and this can lead to more effective pairing.
Step 4: Create swimlanes
Swimlanes help to organise your board and provide a visual separation between different types of work. You can create swimlanes based on the type of work, the team member responsible for the work, or the priority of the work. Swimlanes make it easier to track progress and identify bottlenecks in the workflow.
It may be useful to have a swim lane to separate support requests or bug fixes from regular feature work as the higher priority work is easily identified without needing to shuffle cards within a lane.
Step 5: Review and refine
Once you have designed your board, review it regularly with your team to ensure it meets their needs. Refine it based on feedback and continue to make adjustments as needed to optimise your team’s workflow. A well-designed Kanban board can help your team stay organised, focus on completing work, and deliver high-quality software more efficiently.
Conclusion
In conclusion, designing a Kanban board is an essential part of the software development process. By following these seven steps, you can create an advanced Kanban process that helps your team stay organised and productive. Remember to involve your team in the process, customise the board to meet your team’s needs, and continue to refine it based on feedback.